How
to Advertise on Pinterest
With your newfound expertise on
Pinterest ad formats, you’re now ready to setup a Pinterest ad campaign.
Step 1: Get a business account
Either convert your existing Pinterest
account to a business account, or create a new account for your business.
Our guideto using Pinterest for business goes over the fundamentals of starting
up a brand account.

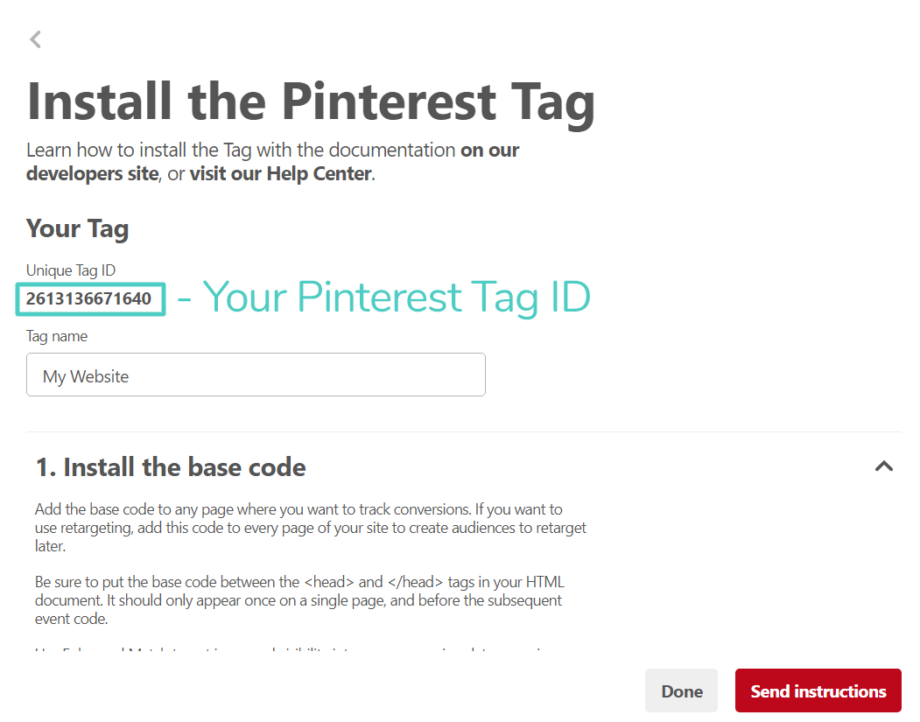
Step 2: Install the Pinterest Tag
Before starting a Pinterest ad campaign, make sure you have installed the PinterestTag. With the Promoted Tag you’ll be able to track the actions people take on your website after seeing your Pinterest ads, including checkouts, sign ups, and searches.

Step
3: Choose your campaign goal
Each campaign starts at ads.pinterest.com with an objective. Choosing the rightgoal is important because it will determine what ad formats are available and how you bid in the ad auction.

There are four campaign objectives
available:
- Get
traffic to your website. Earn high-quality leads and send
Pinners to your website. You pay-per each click.
- Build
brand awareness. Gain broad exposure with current and
prospective customers. You get charged per 1,000 impressions.
- Increase
installs for your app. There are two ways to promote app
downloads on Pinterest. When you pay by install, Pinterest regularly adjusts
your bid based on your budget. When you pay by the click, your ad is optimized
for click traffic.
- Build awareness through video views. Autoplay videos are ideal for promoting awareness and consideration. You pay per 1,000 impressions.
Step
4: Choose your campaign budget
Add your campaign name and then set
your daily and lifetime spend limit. More specific pricing parameters will come
later.
If you’re creating a carousel ad
campaign, make sure you enable the option. This will only work if you’ve
selected brand awareness as your campaign objective.

Step
5: Create an ad group
Choose a pre-existing ad group or
create a new one. Think of an ad group as a container for your Promoted Pins.
Each ad group can have a different assigned budget and different targeting.
Ad groups help you manage multiple
goals within a single campaign. For example, perhaps you’d like to target
specific content to a particular geography, but you have a limited budget for
it.
Plan to launch with between two and four Pins per ad group.

Step
6: Choose your target audience
Set the parameters for the audience
you would like to reach with your campaign.
You can target based on gender, location, language, and device. If your Pinterest ad campaign objectives are traffic or awareness, use a broad targeting strategy to avoid low click volume.

Read our guide on the top Pinterest demographics that matter to social media marketers.
Step
7: Select ad placement
If your budget permits, go with the
all placements default. Otherwise there are two primary avenues for your ads to
appear in: Browse and Search.
Browse placements end up in the home feed and related pins. They pair nicely with interest targeting, whereas search result placements perform better with keyword targeting.

Step
8: Add interests and keywords
You can expand on your targeting by
adding interest and keyword targeting as well. This setting will ensure that
your ads are automatically targeted to relevant searches and interests.
Pinterest finds
that in in general, campaigns improve reach, click-through rates, and better
achieve scale when interest and keyword targeting is enabled.

Keyword
formatting
- Broad match: art modern
- Phrase match: “art modern”
- Exact match: [art modern]
Not
sure what keywords to add? Learn how to find relevant keyword here.
Step
9: Set your budget and schedule
Enter the start and end date for your
Pinterest ad campaign. Then set your daily or lifetime budget. Your daily
budget sets your daily spending limit for your ad group. The lifetime budget is
the total amount you want to spend between your start and end date.
Be careful what you add here, because this cannot be edited later on.

Here’s
a video summary of steps 5-10:
Start by setting a maximum bid for your Pinterest ads. This is also known as your target CPM rate.
Minimum bids must be above $2.00.

Step
11: Determine your pacing
There are two types of pacing options
for your Pinterest ad campaign: Standard and accelerated. Standard pacing
aligns your bids with your overall spend and campaign duration. Accelerated
pacing may be better for high impact campaigns as it enables faster delivery of
your budget and faster results.
Step
12: Pick your Promoted Pins
Click Pick a Pin to add Pins to your ad group. Remember, each ad group should aim to include two-four Pins. You can either create new Pins or pick Pins that you’ve added before. Assigned each Pin with a name and a URL.
For Pins to be eligible, they must:
- Be saved to your profile
- Not be saved to secret boards
- Have destination URLs (they should not be shortened)
- Not feature third-party videos or GIF
Pinterest will never spend over your
daily or total budget caps, but accelerated pacing may drain your budget before
your campaign end date.
Step
13: Monitor campaign performance
Click on Analytics from the Pinterest
Ads Manager dashboard to measure the performance of your
campaign. You’ll first be presented with an overview of all campaigns and their
key metrics, including total clicks or impressions; engagement rate or CTR;
average eCPM (earned and non-earned cost-per impression) and eCPC (effective cost-per
click); and total spend. Click on a specific campaign to drill down into its
performance details.
Each
campaign is different, but a few ways you can further optimize your campaign
are to broaden your audience, increase your budget, try different formats, or
plan around events.

Read our detailed guide to Pinterest Analytics.


0 comments:
Post a Comment